Virtual connections and row level security in Tableau

As always, the newest version (2021.4) added some great new features. One of them, much awaited, is virtual connections that also includes centralized row level security.
Row level security is the practice of restricting the database rows can be seen by a given user depending on their profile. For example, regional managers who should only see results their region. Centralizing this practice means that we have one central place where the definition of the security rules is stored, and that this logic is not duplicated. In Tableau’s new release, virtual connections allow for this possibility, thus simplifying the task of implementing and maintaining row level security on an organisation’s data.

Virtual connections are exactly what their name suggests: objects containing all connection information to a database: URL, port, username and password. They can be used as a proxy to access the database via Tableau. Virtual connections work as any other type of connection and therefore can be combined with other data and enriched with calculations to create the more usual Tableau data sources. As a bonus, security rules can be embedded in a virtual connection so that they are automatically applied whenever the connection is used.

To give you a concrete scenario, let us imagine a company with a sales dashboard. Every region manager should only see their region data and all sales personnel should only see their own sales opportunities independently of the region. Therefore, we need to apply Row Level Security to only show to users the rows they are entitled to.
In the following, we show how to create a virtual connection, how to define security rules and how to use it in Tableau Desktop.
How to create a virtual connection
Virtual connections are a server feature available with the Data Management add-on of Tableau and can be created in Tableau Server or Tableau Online. In the following example, we will connect to a Snowflake database containing sales data.
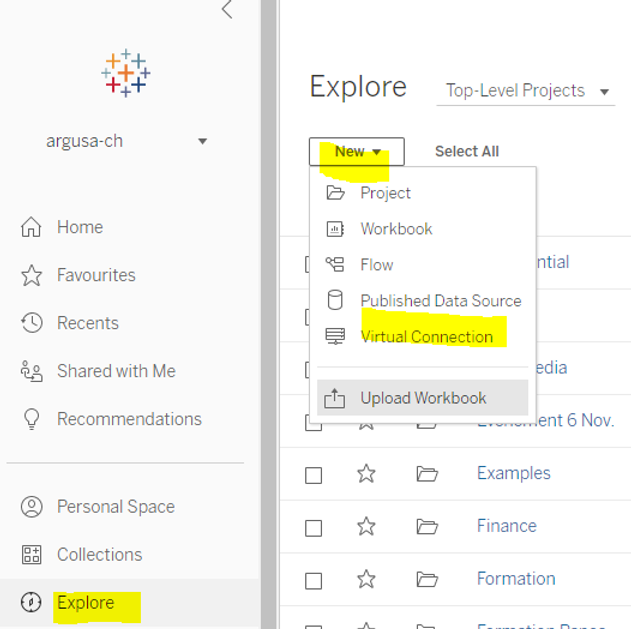
To create a new connection, you can go to the “Explore” page and click on “New” and “Virtual connection” as shown in the image below.
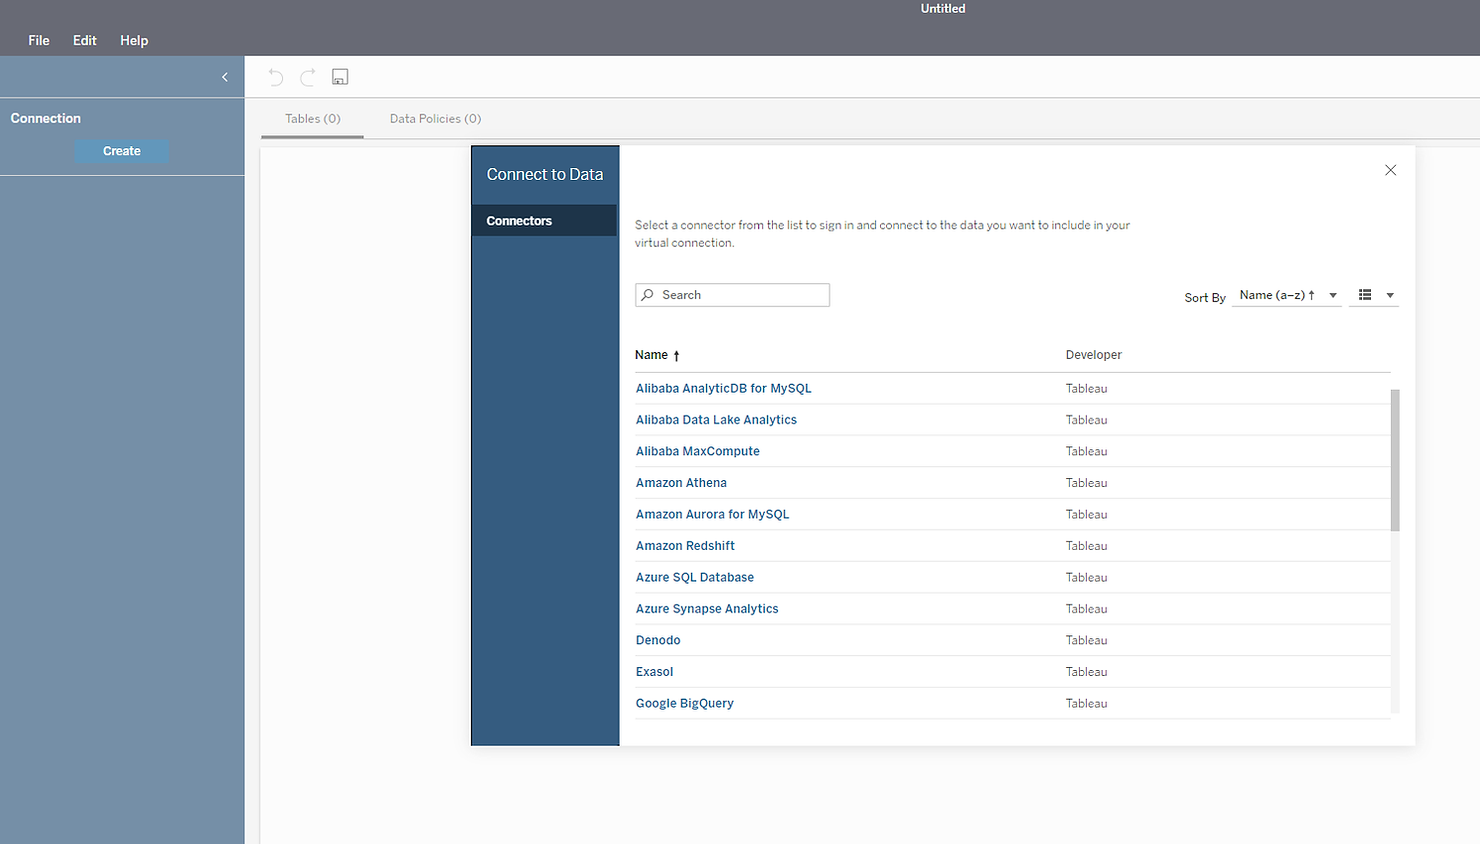
A new window opens where you can select the database type and then connect to it. The page below is similar to what was already available for data sources.
We will connect to our Snowflake instance where we have two tables:
· “DEALS”, containing deal information including the region the deals fall into and the assigned sales person,
· EMPLOYEES containing employee information including the assignation of managers to one or more regions.
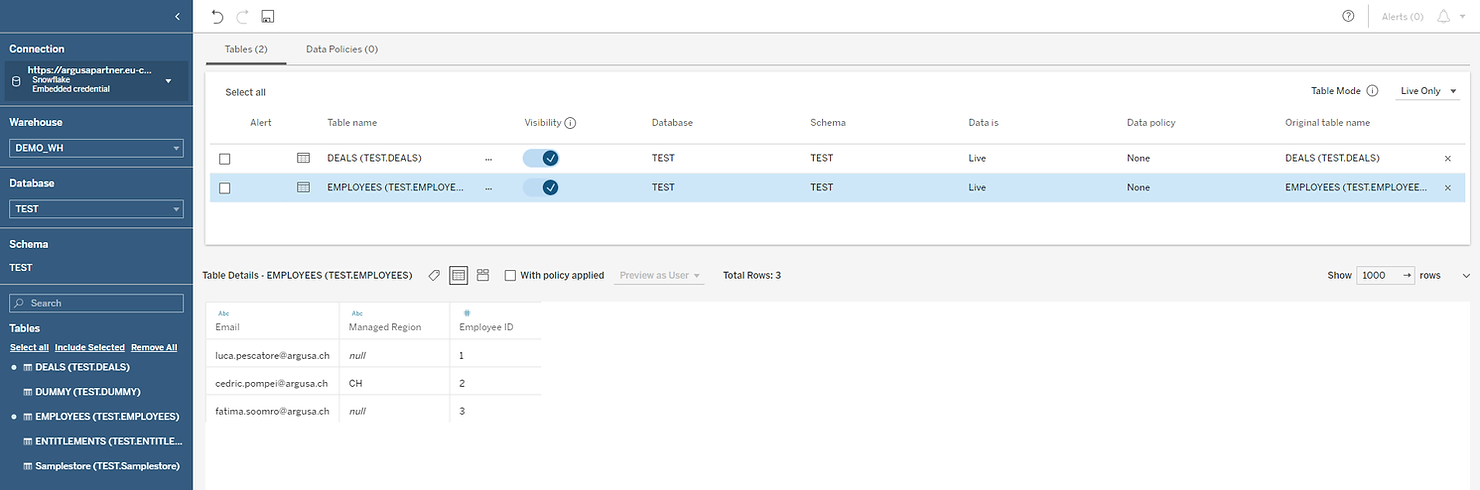
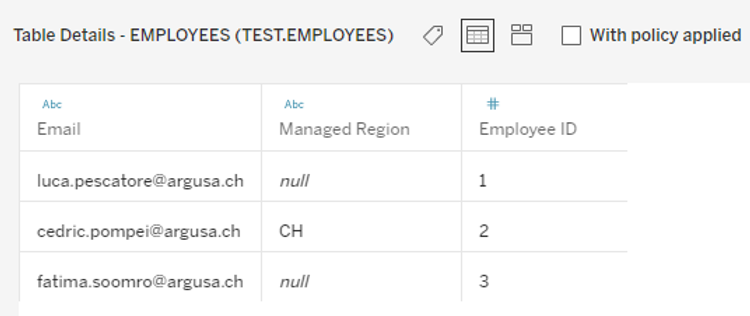
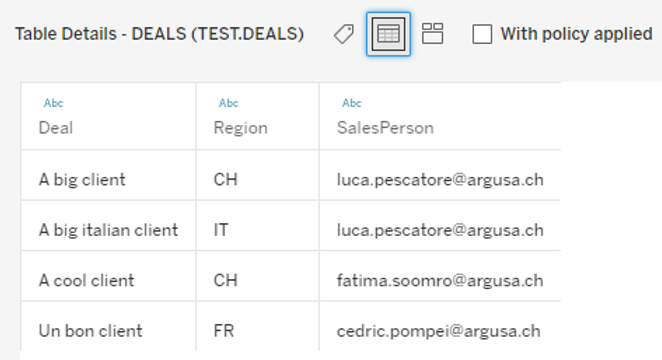
A preview of the data is shown at the bottom of the window and, for our demo, the full data looks like the following:
How to define security rules
In this demo we will implement the following security rules:
· Each sales person can see their own deals
· The managers can see all deals in their region as defined in the EMPLOYEES table.
To keep it simple, we only have one manager Cédric Pompei (Argusa’s CEO!) who has access to the “CH” region.
In order to define security rules we can click on the “Data Policies” tab, then on the “Create New Policy” button and finally drag the employees table in the work area.
Two landing zones appear :“Policy table” and “Entitlement table”. The Policy table is the table on which the security will be applied. The Entitlement table is the table mapping users and their rights. We want to use the Employee table as an entitlement mapping so we drag it on to the landing zone named “Entitlement table” .

In the interface, the entitlement tables appear on the top, as shown in the picture below.
We can now also drag the deals table on the work area to apply the security rules to it. Finally, we select from the menu the field that maps the two tables, which is the region in our case:

In the calculation editor just on the right we can now define our security rule. The rule is the following:
[Email]=USERNAME() OR [SalesPerson]=USERNAME()where USERNAME() is the Tableau function to retrieve the username of the currently connected user. For Tableau Online it corresponds to the email of the user.
· In the first part of the condition, the field “Email” comes from the Employees table. This condition tells Tableau to allow lines for employees whose “Managed region” matches the deal “Region”.
· In the second condition, “SalesPerson” is a field of the deals table. This condition tells Tableau to allow lines that have the currently logged user as a sales person.
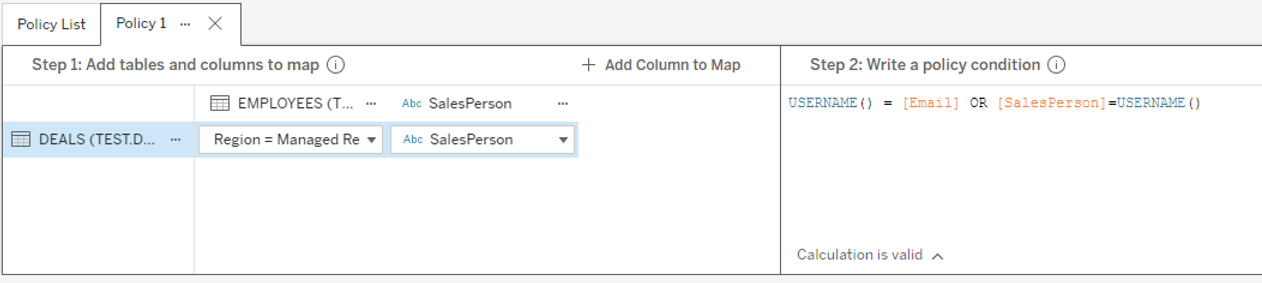
The rule is defined!
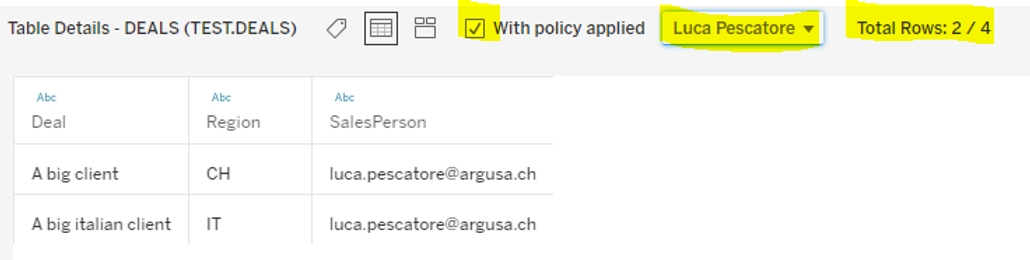
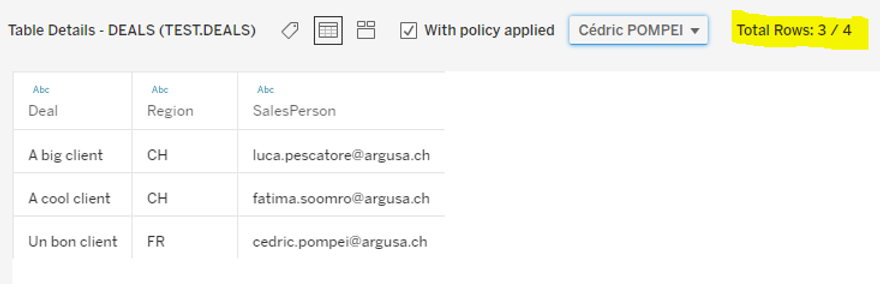
It is now time to check if the security rule does what we expect. At the top of the data preview you can check the “With policy applied” mark to see the effect of the security rules.
You can also choose a user to test. The possibility to switch users is only present in the phase of creation of the connection when the creator necessarily has access to all data. Note that every time one wants to edit the virtual connection Tableau asks the user for the database password to ensure that the user creating the virtual connection can access all data.
You can see that selecting Luca or Fatima we obtain only the deals for which they are sales persons. An indicator also shows how many lines the selected user can see over the total.
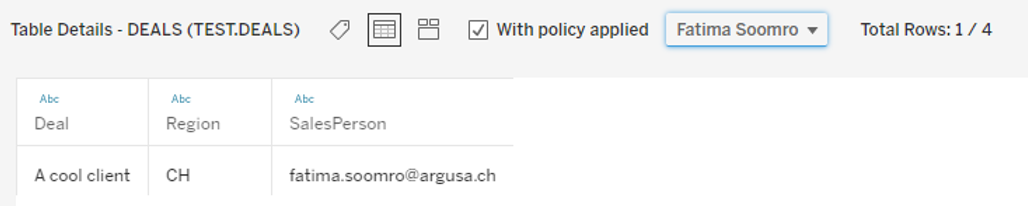
If we switch to Cédric, we can see that he can see all deals from the region CH as he is the region manager and, at the same time, he can see one deal from the “FR” region because he is the sales person assigned to that.
We can publish the connection giving it a name to save the configuration.
How to use virtual connections in Tableau Desktop
From Tableau Desktop, you can look for a virtual connection on the server as you would normally do for published data sources
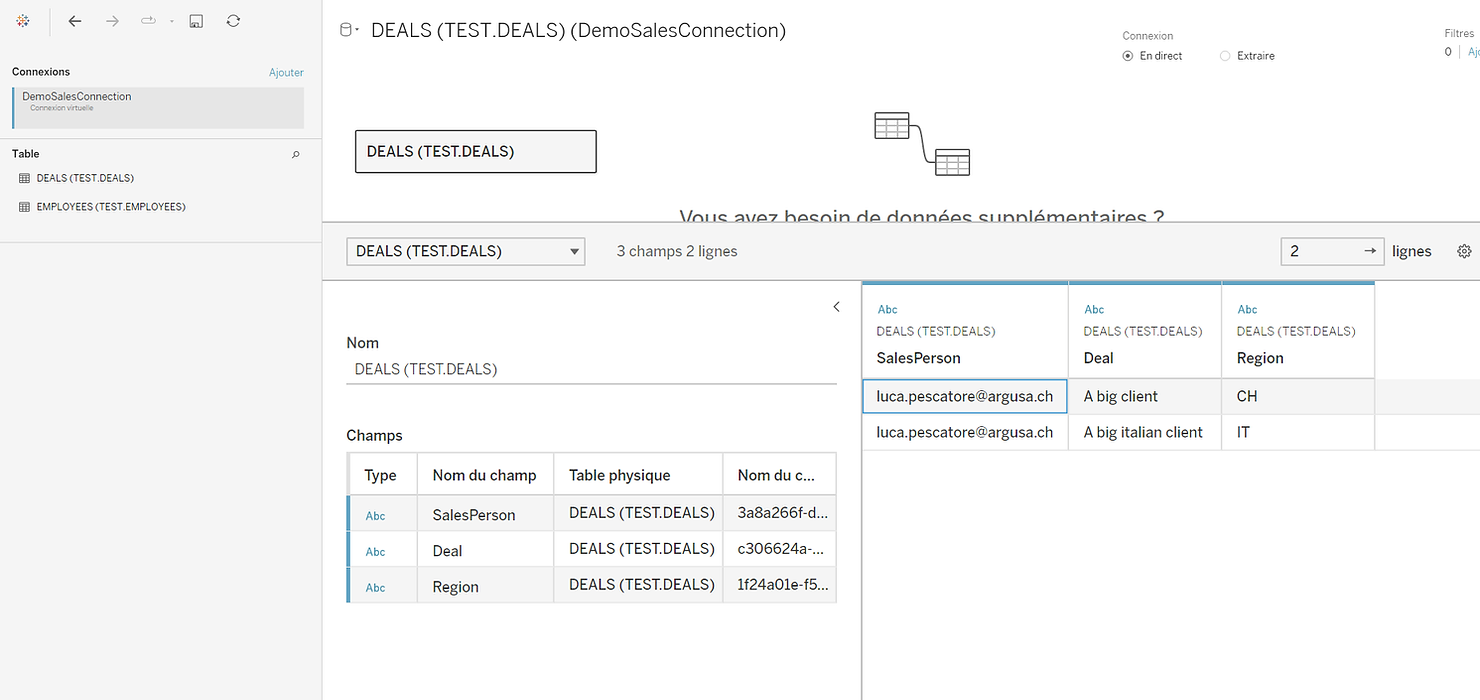
To open such a connection, you do not need to provide any database credentials, as they are stored in the connection itself. Note that I am logged on as Luca so I can see only two lines! Therefore, I cannot modify the user and I can only access the data I am allowed to see.
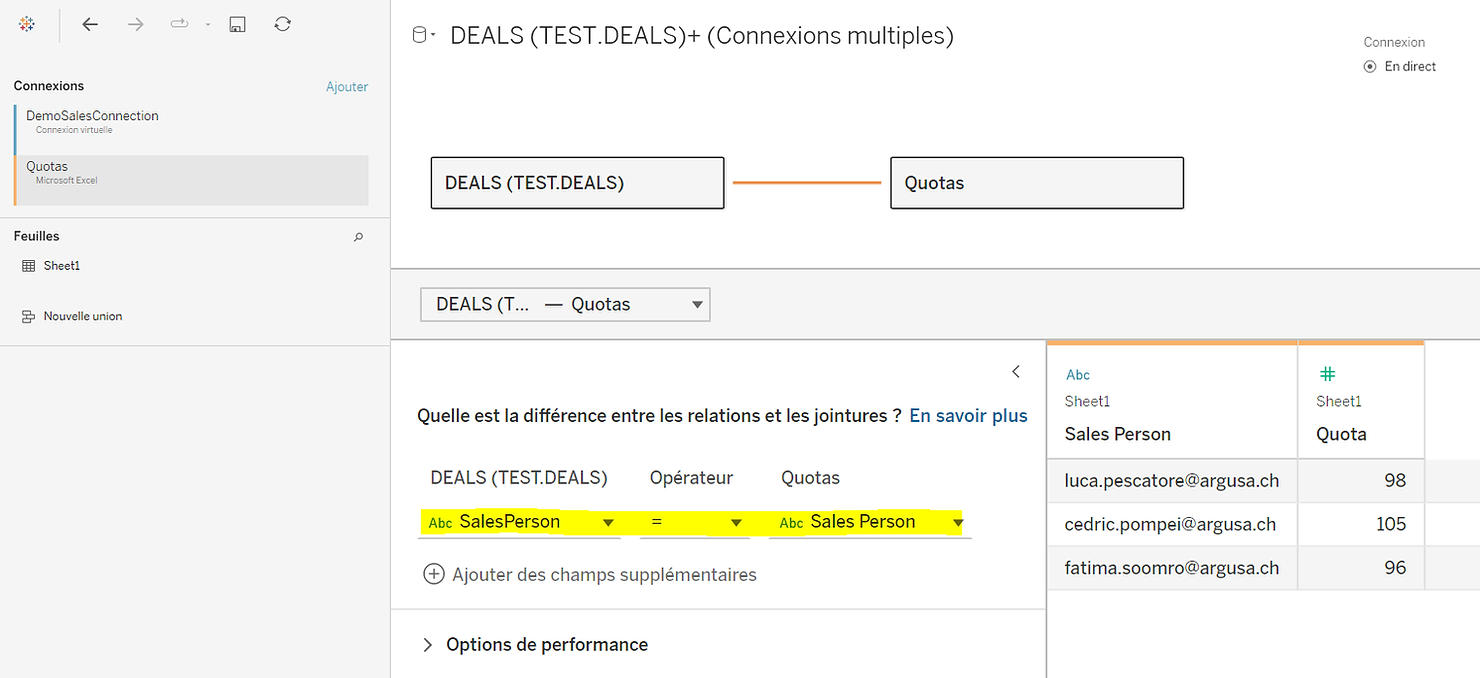
The virtual connection works just like any other connection and therefore you can combine it with other data from other connections. For the demo, we will load a quota.xlsx file containing defined quotas for each sales person and join it with the virtual connection using a relationship.
Conclusion
Virtual connections and centralized row level security are long awaited functionalities that make the Tableau offering even more attractive as self-service BI system. We hope that we have shown you how these new features help automate the integration of the security and hierarchical requirements of large organisations.
As always, the newest version (2021.4) added some great new features. One of them, much awaited, is virtual connections that also includes centralized row level security.
Row level security is the practice of restricting the database rows can be seen by a given user depending on their profile. For example, regional managers who should only see results their region. Centralizing this practice means that we have one central place where the definition of the security rules is stored, and that this logic is not duplicated. In Tableau’s new release, virtual connections allow for this possibility, thus simplifying the task of implementing and maintaining row level security on an organisation’s data.
Virtual connections are exactly what their name suggests: objects containing all connection information to a database: URL, port, username and password. They can be used as a proxy to access the database via Tableau. Virtual connections work as any other type of connection and therefore can be combined with other data and enriched with calculations to create the more usual Tableau data sources. As a bonus, security rules can be embedded in a virtual connection so that they are automatically applied whenever the connection is used.
To give you a concrete scenario, let us imagine a company with a sales dashboard. Every region manager should only see their region data and all sales personnel should only see their own sales opportunities independently of the region. Therefore, we need to apply Row Level Security to only show to users the rows they are entitled to.
In the following, we show how to create a virtual connection, how to define security rules and how to use it in Tableau Desktop.
How to create a virtual connection
Virtual connections are a server feature available with the Data Management add-on of Tableau and can be created in Tableau Server or Tableau Online. In the following example, we will connect to a Snowflake database containing sales data.
To create a new connection, you can go to the “Explore” page and click on “New” and “Virtual connection” as shown in the image below.
A new window opens where you can select the database type and then connect to it. The page below is similar to what was already available for data sources.
We will connect to our Snowflake instance where we have two tables:
· “DEALS”, containing deal information including the region the deals fall into and the assigned sales person,
· EMPLOYEES containing employee information including the assignation of managers to one or more regions.
A preview of the data is shown at the bottom of the window and, for our demo, the full data looks like the following:
How to define security rules
In this demo we will implement the following security rules:
· Each sales person can see their own deals
· The managers can see all deals in their region as defined in the EMPLOYEES table.
To keep it simple, we only have one manager Cédric Pompei (Argusa’s CEO!) who has access to the “CH” region.
In order to define security rules we can click on the “Data Policies” tab, then on the “Create New Policy” button and finally drag the employees table in the work area.
Two landing zones appear :“Policy table” and “Entitlement table”. The Policy table is the table on which the security will be applied. The Entitlement table is the table mapping users and their rights. We want to use the Employee table as an entitlement mapping so we drag it on to the landing zone named “Entitlement table” .
In the interface, the entitlement tables appear on the top, as shown in the picture below.
We can now also drag the deals table on the work area to apply the security rules to it. Finally, we select from the menu the field that maps the two tables, which is the region in our case:
In the calculation editor just on the right we can now define our security rule. The rule is the following:
[Email]=USERNAME() OR [SalesPerson]=USERNAME()where USERNAME() is the Tableau function to retrieve the username of the currently connected user. For Tableau Online it corresponds to the email of the user.
· In the first part of the condition, the field “Email” comes from the Employees table. This condition tells Tableau to allow lines for employees whose “Managed region” matches the deal “Region”.
· In the second condition, “SalesPerson” is a field of the deals table. This condition tells Tableau to allow lines that have the currently logged user as a sales person.
The rule is defined!
It is now time to check if the security rule does what we expect. At the top of the data preview you can check the “With policy applied” mark to see the effect of the security rules.
You can also choose a user to test. The possibility to switch users is only present in the phase of creation of the connection when the creator necessarily has access to all data. Note that every time one wants to edit the virtual connection Tableau asks the user for the database password to ensure that the user creating the virtual connection can access all data.
You can see that selecting Luca or Fatima we obtain only the deals for which they are sales persons. An indicator also shows how many lines the selected user can see over the total.
If we switch to Cédric, we can see that he can see all deals from the region CH as he is the region manager and, at the same time, he can see one deal from the “FR” region because he is the sales person assigned to that.
We can publish the connection giving it a name to save the configuration.
How to use virtual connections in Tableau Desktop
From Tableau Desktop, you can look for a virtual connection on the server as you would normally do for published data sources
To open such a connection, you do not need to provide any database credentials, as they are stored in the connection itself. Note that I am logged on as Luca so I can see only two lines! Therefore, I cannot modify the user and I can only access the data I am allowed to see.
The virtual connection works just like any other connection and therefore you can combine it with other data from other connections. For the demo, we will load a quota.xlsx file containing defined quotas for each sales person and join it with the virtual connection using a relationship.
Conclusion
Virtual connections and centralized row level security are long awaited functionalities that make the Tableau offering even more attractive as self-service BI system. We hope that we have shown you how these new features help automate the integration of the security and hierarchical requirements of large organisations.